Monday, February 11, 2013

Bettye Ann's Cheese Cake

0
by 
Cindy

This isn't a picture of cheese cake, but it's the sweetest little baby girl you've ever seen (of course I'm partial- lol).  We had a baby arrive last week, so we have been busy with our new addition to the family.  Sarah and Nick had a baby girl on January 31, 2013.  She was scheduled to have the baby on February 1st, but nature took it's course and Caroline arrived a day early.  Sarah & Nick decided not to find out the gender of the baby, so we were thrilled when she turned out to be a girl.  Now I have a grandson and a granddaughter.  I spent 5 days there helping out with cooking and being with my favorite little man, Carter.  Caroline is a beautiful baby, and I loved getting be there when she was born.  I enjoyed every minutes that I was there, and look forward to visiting them soon. 

 When I got home I knew I needed to bake something for the blog, and this recipe has been on my mind to make for a while.    I've had it in my notebook for many, many years, and I've made it many times.  It's a  cheese cake recipe that is sooo quick, easy, and good.  It would be a perfect dessert for a special Valentine's Day meal or just as a treat later that night.  It is very similar to other cheese cake recipes, but there is no special springform pan needed.  It tastes lighter than the traditional cheese cake tastes, and I think that is because it's not as thick.  This recipe calls for a 11x13 inch baking dish, so it turns out more like a bar than a thick cheese cake.  It could be made in a smaller baking dish and would turn out more like the traditional cheese cakes turn out.  I like the size and thickness, and it doesn't have to cook as long so it's quicker to make.  Any kind of fruit topping would be great, but I chose blueberry topping.  Show your love and make something special for your Valentine this week. 

Bettye Ann's Cheese Cake

11 graham crackers, crushed (1 pkg)
1/2 cup sugar
1/2 cup melted butter

2 - 8 ounce pkgs cream cheese
1 cup sugar
2 eggs
1 t vanilla

1.  Mix together crushed graham crackers, sugar, and melted butter.  Pat in the bottom of a 11x13 inch       baking dish. (For a thicker cheese cake use a smaller pan).

I used this metal measuring cup and sprayed the bottom of it with vegetable spray.  Then I pressed the graham cracker crumbs down with it. 
2.  Mix together cream cheese and sugar until smooth.  Add eggs, one at a time, blending after each.  Add vanilla.  Pour filling over crust and spread evenly.  Bake at 375 degrees for 15 minutes.  (Add more time if you use a smaller dish and cake is thicker).
 
3.  Top with cherry pie filling or any type fruit topping.


Blueberry Sauce

2 cups frozen blueberries
1 t cornstarch
1/8 cup water
1 1/2 t lemon juice
4 T sugar

Mix together the water, cornstarch, lemon juice, and sugar in a small sauce pan.  Heat on medium to medium high until it starts to thicken, then add the blueberries.  Cook until bubbly but not boiling.  Cool.  Serve over cheese cake.


Recipe from
Bettye Ann Breivogel given to me by Donna Hartig (Thanks Donna!)
Blueberry Sauce adapted from
natashaskitchen.com


Read More »

Saturday, January 26, 2013

Pear and Gorgonzola Tart

0
By Christy


Fall has come and gone, and we are officially in full fledged winter in Nashville. A winter weather advisory is actually in place for tonight with expectations of ice in the area. Something about cold weather always makes me want to bake but tonight I resisted the urge because like most of us during the holidays we get behind on many of our tasks, and one thing I am behind on is posting quite a few recipes I have tried in the last two months.

BigCat and I were home in KY during November for hunting season and I couldn't help but hit up my grandfather's HUGE Bartlett pear tree. It was covered in the most delicious sweet pears. I haven't really cooked with pears before but was determined since I had struck gold in the pear department that I needed to share a pear recipe.

If you love Gorgonzola cheese, this dish is for you!
Ingredients:
Puff Pastry Sheets defrosted
3 Bartlett pears, peeled, cored, and sliced
3/4 cup Gorgonzola cheese
1/3 cup Ricotta Cheese
1/4 cup Pecans or Walnuts
2 tablespoons butter

Preheat the oven to 350.  Roll out the puff pastry into a pan or a tart pan. Poke the pastry with a fork all around the surface.
Mix the cheeses together and spread 3/4ths the mixture over the pastry. Top with the slices of pears, and topped with nuts. Rub melted butter on top of the pears and nuts. Crumble the remaining cheese mixture over the top.

Bake for 30 minutes or until the pastry is golden brown. This dish is awesome served with a green salad.

This dish made it girls dinner party.


Read More »

Friday, January 18, 2013

Chocolate Fudge Cheesecake

0
by Cindy


I made several really good desserts during the holidays, and Christy really loved this one.  This cheesecake has a brownie bottom with the traditional cheesecake on top of that, topped with a chocolate glaze over the cheesecake layer.  I loved the brownie bottom and the top is just a delicious cheesecake.  I didn't want to make 2 large cheesecakes, so I halved the recipe and made 4 mini cheesecakes.  Cheesecakes freeze really well so I froze one for later.  Since it called for 7 eggs and I can't half an egg, I just beat the fourth egg a little and only used half of that.  I also cut the baking time a little and kept a close watch on them.  The recipe is easy to follow and oh so good! 
Chocolate Brownie Cheesecake

1/2 cup toasted, chopped pecans
4 (1-ounce) unsweetened chocolate baking squares
1 cup butter, softened
2 cups sugar
4 large eggs
1 cup all-purpose flour
1 t vanilla extract
1 cup semisweet chocolate morsels
4 (8-ounce) packages cream cheese, softened
1 3/4 cup sugar
7 large eggs
2 t vanilla
2 Chocolate Glaze

Sprinkle 1/2 cup pecans evenly over the bottom of each of 2 greased and floured 9-inch springform pans.

Microwave chocolate squares in a microwave-safe bowl at MEDIUM (50% power) 1 1/2 minutes, stirring at 30-second intervals until melted.  Stir until smooth.

Beat butter and 2 cups sugar at medium speed with an electric mixer until light and fluffy.  Add 4 eggs, 1 at a time, beating just until blended after each addition.  Add melted chocolate, beating just until blended.

Add flour, beating at low speed just until blended.  Stir in 1 teaspoon vanilla and chocolate morsels.  Divide batter evenly between pans, spreading over chopped pecans.

Beat cream cheese at medium speed with an electric mixer until smooth; add 1 3/4 cups sugar, beating until blended.  Add 7 eggs, 1 at a time, beating just until blended after each addition.  Stir in 2 teaspoons vanilla.  Divide cream cheese mixture evenly between each pan, spreading over brownie batter.

Bake at 325 degrees for 1 hour and 15 minutes or until set.  Remove from oven; cool completely on wire racks.

Spread top of each cooled cheesecake with 1 recipe Chocolate Glaze.  For a thinner layer of chocolate on top, divide 1 recipe of glaze between the two cakes.


 Chocolate Glaze

1 (12-ounce) package semisweet chocolate morsels
1/2 cup whipping cream

Melt 1 (12-ounce) package semisweet chocolate morsels and 1/2 cup whipping cream in a 2-quart microwave-safe bowl at MEDIUM (50% power) 2 1/2 to 3 minutes or until chocolate begins to melt.  Whisk until chocolate melts and mixture is smooth.


recipe from
Southern Living
December 2005
Read More »

Tuesday, January 8, 2013

2012 Top Ten

0
Happpppy New year! Can you believe it is already 2013?

2012 has been a very "sweet" year for us Buttercream Bakers and we have a top ten list of our readers favorite posts to prove it.
1) Cheesecake filled Carrot Cake Cupcakes with Cream Cheese Frosting


Trends this year on our site:
  • Cupcakes!
  • Non-Dessert Items!
What was your favorite BcB post from 2012? Did you try any of our posted recipes?
Read More »

Monday, January 7, 2013

Crème Brûlée

0
By Cindy

Happy New Year!
Well the new year is well on its way, and I'm among the many people who are thinking about trying to lose weight.  Before the year ended though, I decided to make something that was really special and not low calorie.  I wanted to make something for Christmas Day dessert that would be really above and beyond. It seems like whenever I'm out eating with a group of people, many of them order Crème Brûlée, so that's what I made.  Christy was home, and I asked her if I should make it the quick, easy way or the harder way.  She told me the hard way, so here are the instructions and the recipe that I used.   It's not really hard but it takes a little time from start to finish, and a small butane torch is required.  It can be made ahead of time and that is a big plus for me.  It tasted smooth and creamy with the crunchy sugar top that was hardened by the torch flame right before it was served.  

 Crème Brûlée

4 cups Heavy Cream
1 whole Vanilla Bean OR 1 Tablespoon Vanilla Extract OR 1 Tablespoon Vanilla Paste
10 whole Egg Yolks
3/4 cups Sugar
6 Tablespoons Superfine (Baker's) Sugar

Preheat oven to 325 degrees.
Pour the cream into the saucepan. Add vanilla (whichever product you're using) and simmer over medium-low heat.
Whip egg yolks with the sugar until pale yellow and thick.
Strain cream using a fine mesh strainer.

Whip yolks while you very slowly drizzle in 1 cup of warm cream. Go slowly so as not to cook the eggs! Once the first cup is added, you can add the rest of the cream slowly.
Place ramekins onto a rimmed baking sheet. Pour custard mixture into ramekins. Pour water in bottom of baking sheet until it comes halfway up the ramekins. Bake for 30 minutes, or until just set. Do not allow to get brown.
Cool ramekins on countertop, then chill for at least 2-3 hours, covered in plastic wrap.
To serve, sprinkle 1 tablespoon over each ramekin of custard. Use a kitchen torch to quickly (but carefully) brown the sugar. There should be a thin, crisp surface of burned sugar on the top.
Serve immediately!


recipe from
The Pioneer Woman
Read More »

Wednesday, December 19, 2012

White Chocolate Party Mix

1
by Cindy
 
  I love to have people over to my house, but since I've moved only my family has been for Thanksgiving and Christmas, etc.  I used to have the Christmas meeting of the United Methodist Women every year, and I loved it.  I would bake and freeze cookies and goodies so it wouldn't be so hard the days before the meeting.  The women invited me to attend this year and it was to be held in Henderson, but there was a death in the church so it was postponed.  As it turned out, I offered to have it at my house, and the ladies and the preacher came over on Monday night.  Since it was last minute and I was gone over the weekend, I did ask them to bring food to accompany my Italian Beef Sandwiches and Red Velvet Cake (my fave!).  Thanks ladies and Brother Michael for making the hour drive and coming to visit and fellowship at my home.  It was heart warming to be with them again. All of the food was wonderful, and we had our dirty Santa gift exchange.  There is always one gift that everyone wants but it was taken from me. lol.  I sent everyone home with a goodie sack of White Chocolate Party Mix.   It is so quick and easy to make, and it is so addictive.  If you need something fast and easy, this is for you.  It makes quite a bit too. 
I'm enjoying the season and hope you are too.  Share the love, make someone something special.  

White Chocolate Party Mix

3 cups Cheerios
3 cups Rice Chex
3 cups Corn Chex
2 cups tiny pretzels
2 cups dry roasted peanuts
2 cups M&Ms or 1-12oz pkg
1 cup raisins
24 oz pkg white almond bark

Mix together the first 7 ingredients in a large bowl.  
 
Melt bark over boiling water or in a microwave. There are directions on the package on how to melt it.  I just followed those directions and melted it in the microwave. 
 
 Pour white chocolate over the mixture and stir well gently to cover all pieces.  Spread on wax paper to dry.  
 
Break up pieces, and store in an air tight container. 


recipe origin unknown
given to me by a friend
Read More »

Wednesday, December 12, 2012

German Chocolate Bundt Cake

0
By Christy


It's the time of year when friends and families get together, companies and church groups have potlucks, dinner parties, cocktail parties, tacky Christmas parties….. (It's the time of year you get out your "big" pants you save in the back of you closet. lol) But I love this time of year because so many people feel inspired to turn on their ovens and bake all kinds of delicious treats! 

Bundt cakes are all the rage in Nashville (and probably other surrounding cities) right now. Between having mini bundt cake pans all the way to bakeries focused specifically on bundt cakes (Seriously…. Nothing Bundt Cakes are AWESOME! For locations, click on this hyperlink!), these delicious dense cakes are having their share of time in the spotlight right now. If you want to jump on the band wagon for one of your events here is a delicious recipe for a super moist and tasty twist on a german chocolate cake.


Ingredients:
1 1/4 cups water
1/4 cup butter
1 cup packed brown sugar
1 cup flaked coconut
2 cups (12 oz) semisweet chocolate chips
1 cup chopped pecans
2 cups mini marshmallows
1 package german chocolate cake mix prepared according to box

In a small sauce pan, heat the water and butter until the butter is melted. Stir in the brown sugar and mix well. Pour into the bottom of the bundt pan. Sprinkle the following onto the butter mixture in this order: Coconut, chocolate, pecans and lastly marshmallows. 
Prepare the cake batter according to the box directions. Carefully pour the batter into the pan over the other ingredients. Bake the cake according to the directions on the box and cook until a toothpick inserted near the center tests clean. Cool for 5-10 minutes before inverting the cake onto a platter. 
Enjoy!

Read More »

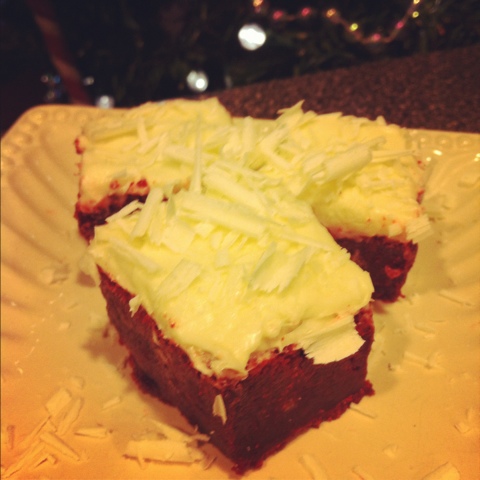
Red Velvet Brownies

0
by Cindy


Everyone who knows me knows I love Red Velvet Cake.  That's true, but what I really love is the icing on top of the Red Velvet Cake.  I usually make red velvet cake for Thanksgiving, but decided that it wasn't a good idea.  I knew that there would be leftover cake, and that I would eat every last morsel until it was all gone.  Pretty good will power huh?  If it's not it in the house, I can't eat it.  lol  I did have to break down and make some last night.  I'm taking Red Velvet Cupcakes to my dentist's office today.  I have one right here on my desk to sample just to make sure they taste acceptable. 
 Anyway, I was walking through Dillards the other night and in the makeup section I passed some Southern Living Christmas Cookbooks that were on the counter.  I have always loved these cookbooks, because they have great decoration ideas, meal planning ideas, and of course great recipes.  On the cover is a picture of Red Velvet Brownies, and that is what sold the cookbook.  The price was another reason, and  I went ahead and bought three.  They were only $10 each.  One for me, one for Sarah, and one for Christy. 
I just had to make these they looked so good.  They do taste wonderful.  The brownie tastes just like a normal brownie with red fool coloring added to it.  It is a delicious brownie.  It's dense, moist, and very chocolatey.  The icing is the cream cheese type and is very smooth, creamy and sweet.  The combination is wonderful as usual and they look really lovely.  I doubled the recipes and used a 9x13 inch pan. 

Red Velvet Brownies

Makes 16 servings
Hands-on Time:  15 minutes Total Time: 3 hr., 9 min., including cream cheese frosting

1 (4-oz) bittersweet chocolate baking bar, chopped  (I used semi-sweet chocolate chips)
3/4 cup butter
2 cups sugar
4 large eggs
1 1/2 cups all-purpose flour
1 (1-oz.) bottle red liquid food coloring
1 1/2 t baking powder
1 tsp. vanilla extract
1/8 tsp. salt
Small-Batch Cream Cheese Frosting
Garnish:  white chocolate curls

1.  Preheat oven to 350 degrees.  Line bottom and sides of a 9-inch square pan with aluminum foil, allowing 2 to 3 inches to extend over sides; lightly grease foil.
2.  Microwave chocolate and butter in a large microwave-safe bowl at HIGH 1 1/2 to 2 minutes or until melted and smooth, stirring at 30-second intervals.  Whisk in sugar.  Add eggs, 1 at a time, whisking just until blended after each addition.  Gently stir in flour and next 4 ingredients.  Pour mixture into prepared pan.
3.  Bake at 350 for 44 to 48 minutes or until a wooden pick inserted in center comes out with a few moist crumbs.  Cool completely on wire rack (about 2 hours).
4.  Lift brownies from pan, using foil sides as handles; gently remove foil.  Spread Small-Batch Cream Cheese Frosting on top of brownies, and cut into 16 squares. Garnish, if desired.

Small Batch Cream Cheese Frosting

Makes about 1 2/3 cups
Hands-on Time: 10 min. Total Time: 10 min.

1 (8-oz.) package cream cheese, softened
3 Tbsp. butter, softened
1 1/2 cups powdered sugar
1/8 tsp salt
1 tsp vanilla extract

1.  Beat cream cheese and butter at medium speed with an electric mixer until creamy.  Gradually add powdered sugar and salt, beating until blended.  Stir in vanilla.


Here is a picture of my cupcake that I'm getting ready to eat with my morning coffee.  Yummy!


Recipe from
Southern Living
Cooking for Christmas
Special edition presented exclusively by Dillard's
Read More »

Tuesday, December 4, 2012

Miss Margie's Pecan Pie

0
by Cindy
Wow is it December already?  Christmas is right upon us and it seems like yesterday was summer.  It feels like summer today too with this wonderful warm weather. The last few weeks have been incredibly busy but so wonderful. 
Since all of my family couldn't be together at one time on Thanksgiving, I had two "sittings"at my house that day.  We all enjoyed the food and being together.  It was great to have my mom, brother, and my brother's family over for the first sitting.  My mom, Sarah, Nick and Carter, and Christy and her boyfriend, Ish, came for the 2nd sitting. Christy's boyfriend's mother, Paula, and JD, a friend from Clay, came to eat with us too.  I love to have friends and family at my house.  It's been a little over a year since I moved from Clay, and even though our family circumstances have changed so much, life is good.  I still miss my friends and church family, but I'm making new friends, and I rejoined the church where I attended as a child just last Sunday. 
The week after Thanksgiving I was lucky enough to have my daughter, Sarah, and her son come and stay with me for three days while she attended a work training.  I took off from work and took care of my favorite little boy, Carter.  I know I had a fantastic time and I hope he did too.. He'll be two years old next week, and it doesn't seem possible.  Sarah's getting ready to have another baby in early February, and we're so excited about number 2.

  For one of my Thanksgiving desserts, I made pecan pie.  Margie, Sarah and Christy's aunt, always brought pecan pie to every Thanksgiving that I held at my house and to many church potluck dinners.  Everyone in Clay knew and loved Miss Margie. For many years, she was the heart of Clay School.  Pecan pie was one of her specialties.  I was wondering about her recipe a few years ago and remembered that it was in an old Clay Elementary Cookbook.  In honor of her, I made her pecan pie recipe for Thanksgiving.  It turned out great, but I did have to cook it longer than the recipe said.  It had a great pecan crunch on top and the middle was sweet, gooey, and rich.  My mom told me the key to cooking a pecan pie long enough is to cook it until it cracks in the center.  The pecan top kind of puffs up and causes the crack, and that's when to take it out of the oven.  I covered the edge of the crust with a gadget that protects the edges, otherwise the crust would have gotten too brown. You can't go wrong with Miss Margie's Pecan Pie, so give it a try during this holiday season.   

Miss Margie's Pecan Pie

1 unbaked pie shell
1 cup sugar
dash salt
1/2 cup dark corn syrup
2 T melted butter
1 cup pecans (chopped or whole)

Preheat oven to 350 degree. Beat sugar, eggs, and salt.
  Add the other ingredients and mix. 
Pour into an unbaked pie shell. 
Bake for 30 minutes or until it sets. (I say about 45 to 60 minutes until it cracks)


Recipe from
Butter 'n Love Recipes
Clay Elementary School

Read More »