Thursday, January 26, 2012

Cinnamon Toast Crunch Bars

0
By: Christy


 Now that I'm a full grown adult, I have (like so many of us have when we discovered its high sugar and carb content and realized our bodies unfortunate inability to burn it off like when we were ten haha) done the socially correct adult thing by graduating to a more mature breakfast of fruit, yogurt, an egg, etc, I often forget about my long lost childhood loves-cereal! Cookie Crisp, Captain Crunch, and Cinnamon Toast Crunch are my all time favorite cereals and they will always hold a sweet (no pun intended LOL) spot in my heart when it comes to not only breakfast but just in general a tasty treat.

That's why when it came to baking with cereal I knew this was a perfect excuse to buy one of my guilty pleasure cereals! With a fully loaded schedule I knew I needed to prepare something easy, and super quick and that's when the idea hit me.... How about a modern twist on the super easy and delicious classic rice crispy treats. I used the same recipe I have for rice crispies but just replaced the rice cereal with the amazingly, super delicious Cinnamon Toast Crunch.

If for some reason Cinnamon Toast Crunch isn't your thing, no worries! You can pretty much use any cereal in this recipe and it probably be absolutely delicious. Ideas for alternatives that quickly come to mind: Fruity or Cocoa Pebbles, Golden Grahams, and Frosted Flakes.

Ingredients:
1 normal size box of Cinnamon Toast Crunch or about 6 cups of cereal
1 bag of marshmallows (or 4 cups mini)
1/3 cup butter


Spray a 9x13 inch pan with non stick spray. Melt butter then add the marshmallows. Once melted pour in cereal and stir making sure to thoroughly coat the cereal. Pour into the pan. It will be sticky, but you will need to compact the cereal. I took a piece of wax paper sprayed lightly with the non stick spray to cover the treats and pushed the cereal down with my hands.
Read More »

Tuesday, January 24, 2012

Rice Krispies 4-Layer Bars

0

by
Cindy

I've already posted several of my favorite recipes that are made with cereal and they were the Peanut Butter Bars and the Cookies in a Jar.  Cereal adds a crunch that can replace nuts or just add more texture to a recipe.  I love pecans so add them to almost everything, but not everyone likes or can eats nuts.  I love this recipe because it is easy and uses ingredients that are usually found in the pantry.  It has a layer of caramel that is so ooy gooey good.  It is a simple recipe and I had all the ingredients except the caramels.  That was a bit of a challenge.  Caramels are easy to find in the fall but not so after the holidays.  I looked for 15 minutes in the grocery store until I finally found them hidden in the fruit and vegetable section.  It has several layers but didn't take very long to make.  I think they taste great and love the goeyness of them.  

3/4 cup butter, softened
3/4 cup packed brown sugar
1 egg yolk
1 1/4 cup all-purpose flour
2 cups Rice Krispies Cereal, divided
1 bag (14 oz.) vanilla caramels (about 48)
3 T milk
1 pkg (12 oz) semi-sweet chocolate chips
1/2 cup coarsely chopped pecans, toasted

In a large bowl combine butter and brown sugar.  Stir in egg yolk. 


 Stir in flour and 1 cup of the Rice Krispies cereal.  Spread mixture with your fingers into a 9 x 13 inch pan sprayed with non stick spray or line with foil. 

 Bake at 350 degrees for 18 to 20 minutes or until light brown.
In a medium microwave-safe bowl combine caramels and milk.  Cook, uncovered, at medium power (50%) for 4 to 6 minutes, stirring every 2 minutes, until melted and smooth.
Spread melted caramel on top of the crust layer.  In a medium microwave-safe bowl place chocolate chips; cook, uncovered, at medium (50%) for 2 to 3 minutes, stirring several times until melted and smooth.  Spread half of the chocolate mixture over caramel layer.  Sprinkle with 1 cup of the cereal and pecans.  Lightly press them into the top. 


Put remaining chocolate into a plastic sandwich baggie and
cut tip off of one of the corners and drizzle remaining melted chocolate evenly over the top.

  Let stand or refrigerate to set.  Cut into squares.

adapted from recipe from http://www.recipe.com/
Read More »

Sunday, January 22, 2012

Brownie Pops

0
Cake pops have been all the rage this past year. Everyone is making them! Walgreen's had a kit for making cake pops (it was on my Christmas list, but unfortunately I didn't get it) and every time I walk in to Starbucks I want to buy the cake pops in the counter. They look delicious! So today I thought to myself, how hard are they to make? Instead of cake pops I decided to make brownie pops. What I discovered was an amazing treat that tasted just like the chocolate truffles my "Mimi" would have at her house every Christmas. She ordered a huge box of truffles with a variety of flavors.  You can just eat one! Mimi's house is where I discovered my love for chocolate. It all started when she would make breakfast in bed for me and my sister on Saturday mornings with scrambled eggs, bacon, and a cup of hot chocolate with mini marshmallows. That, my friend, is the true breakfast of champions!

Happy Baking!
Sarah

Brownie Pops

Brownie Mix
Popsicle sticks
1-2 packages Baker's Chocolate
1-2 packages Baker's White Chocolate

Sprinkles


1.  Make brownies according to recipe.
2. Once cooled, cut the brownies into small squares. Roll these squares into a ball and push popsicle stick in ball a little over half way.
3.  Melt the chocolate in microwave, stirring every 10-15 seconds. Be careful to not overcook, which is easy to do. Once it's almost melted it is usually done. Just keep stirring and it continues to melt.
4. Dip the balls into the chocolate.  Depending on how big your balls are and how many you have will determine the amount of chocolate you will need.
5. Place on parchment paper until chocolate has dried. You can place it in the refrigerator to speed the process up. The chocolate will loose it's glossiness and get a hard consistency.
6. Once the chocolate has hardened, melt the white chocolate.  Dip the brownie pops in the white, but leaving some of the chocolate visible.
7. Dip into sprinkles.  (Hint: Place sprinkles in cupcake liners for the sprinkles or small ramekin.)


Read More »

Friday, January 20, 2012

Blondies

0
By Christy

I had full intentions this week to post two brownies recipes.... one for the beloved recipe below and another for a to die for chocolcate brownie. (who knows, maybe I will get frisky this weekend and bake them) But this week has been a doozy for me between work, life, and adding my MBA class back into my routine (started executive accounting last week... ZZZzzzzZZZZ), so I apologize I am a little late in my post this week.

This week I made blondies for my 'bake brownies' week. You may be asking yourself, "what is a blondie?"... Well a blondie is a blonde + brownie = BLONDIE dessert bar. I made these delicious blondies for a baby shower at work. Something as simple as a blondie is sure to please a crowd!!!


Ingredients
2 sticks of butter (16 tablespoons), melted
2 cups brown sugar
2 large egg
2 teaspoon vanilla
large pinch of salt
2 cups all-purpose flour
1 cup chocolate chips
1 cup walnuts (or pecans)

Preheat the oven to 350. Spray 9x13 with bakers joy. Mix the melted butter with the brown sugar in a mixer -- Beat the mixture until smooth. While mixing, add in the eggs and vanilla. Add the salt and slowly add in the flour. With a rubber spatula, fold in the nuts and chocolate chips. Spread mixture into the 9x13 pan. Bake for 25 minutes... Don't over bake, they are delicious when they are moist and gooey! So pay attention for golden edges and a firm center! Completely cool the blondies before cutting. I also cut my blondies with the same tool my mother used! It truly does make for perfect cuts!


Read More »

Wednesday, January 18, 2012

Cheesecake Brownies

0
by Cindy

     This week is one of my favorite categories - brownies.  Christy blogs a lot about loving chocolate but she must have gotten that from me because I'm a total chocoholic.  I think I inherited that from my mother too.  I don't know what it is but eating chocolate just makes me feel better.  My favorite brownie package mix is the Betty Crocker Original Supreme Brownie Mix with Hershey's Chocolate Syrup.These brownies are so moist and delicious.  My cousin Katie came for a visit once and wanted the recipe because she loved them so much.  She couldn't believe they were made with a package mix. 
      If I just make the plain brownies, I mix up all the ingredients except the Hershey's chocolate syrup packet. I spread out the brownie mixture in my 9 x 13 inch pan, then I pour the syrup up and down the top of the brownie mix.  I take a spatula and swirl the syrup into the mix just to barely mix it in. I add pecans on top and then bake them. 
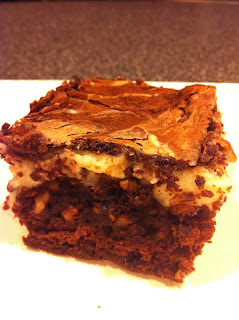
      I used the Betty Crocker Original Supreme Brownie Mix for my cheesecake brownies.  They turned out beautifully.  I decided that I wanted a thick brownie, so I used a 8 x 8 inch pan and lined it with aluminum foil so that when I cut them they looked perfect. I sprayed the foil with nonstick spray and they didn't stick to the foil at all.  I have a cutting tool that works really well .  It makes a very clean cut so the brownies turn out nicely.  They taste very chocolately and with the cream cheese layer they do taste like cheesecake.  It is a great combination of flavors so give it a try.  These brownies would be a hit at any gathering.


Betty Crocker Original Supreme Brownie Mix with Hershey's Chocolate Syrup
1/2 cup chopped pecans
1 egg
1/4 cup vegetable oil
1/4 cup water
1 8-oz cream cheese (softened)
2 T butter (softened)
1/3 cup sugar
1 T flour
1 t vanilla


Mix brownie mix according to the package using the egg, water, and oil.  Spread 3/4 of the brownie mix in a 9 x 13 inch pan or for a thicker brownie in an 8 x 8 inch pan lined with foil.  Spray the foil with nonstick spray.  Sprinkle the pecans on top.  Mix together cream cheese, sugar, butter, flour and vanilla until light and fluffy.  Spread this on the brownie mixture.  Spread the leftover batter on the cream cheese mixture and using a spatula or knife swirl the mixtures together for a marbled effect.  Bake in a 350 degree preheated oven.  Use the baking time guide on the brownie mix box and bake until a toothpick comes out almost clean.  Cool completely before cutting. 

recipe from Allrecipes.com

Read More »

Sunday, January 15, 2012

Low Fat Individual Sized Monkey Bread

0
Sugar, cinnamon, bread, butter...all of these ingredients together equals yummy! A treat that I like to eat, but don't make very often is monkey bread. It's so good! When I make it, I cannot control myself and eat most of it. Nick is lucky if he gets a few bites.  Recently, I have been craving it, but since I've been trying to lose the baby weight, I've held off on making it. That was until I found a low fat monkey bread recipe that is just as delicious!! This recipe is based on the real monkey bread recipe, but with significantly less calories and fat, but same great taste.  I also think it's really cute to bake individual servings in a cupcake pan. Enjoy!!

-Sarah

Low-Fat Monkey Bread
by Hungry Girl

3 T Splenda, divided
2 t cinnamon, divided
2 T light whipped butter (I used Brummel and Brown)
2 T sugar free pancake syrup
2 T brown sugar (I used Splenda's version of Brown Sugar), not packed
1 package Pillsbury Crescent Seamless Dough Sheet (you could also use the low fat crescent rolls and roll it out)
1/2 t baking powder


1. Preheat oven to 350 degrees. Spray a muffin pan with nonstick spray.  Set aside. Mix 1 T Splenda and 1 t cinnamon in a large bowl.  Set aside.

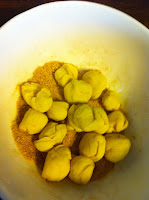
2.  Roll out dough and sprinkle evenly with baking powder.  Cut dough sheet widthwise into six equal size strips.  Cut each strip into 4 squares.  Roll the squares into a ball. This should make 24 balls.

3.  Place half of the balls in the bowl with the Splenda-cinnamon mix.  Lightly toss to coat.  Place coated balls in the muffin pan.  Let them fall into place without pushing them in the pan. Repeat coating the remaining balls and placing them in the muffin pan.

4.  In a small pot, add butter, syrup, brown sugar, 2 T Splenda, and 1 t cinnamon. Over medium heat, stir mixture frequently until butter has melted and mixed well.  Evenly spoon the mixture of the dough balls.

5.  Bake for 15-20 minutes or until puffy and firm. Allow a few minutes to cool and then enjoy!!


Read More »

Thursday, January 12, 2012

Low Fat Chocolate Peanut Butter Pie

0
By: Christy

One thing I don't think I could live without in life is chocolate, ( I know....I have professed on here time and time again my deep love for chocolate. It's a problem haha) So when I am watching my calorie intake I have to find yummy substitutions to fill my sweet tooth. Below is a another weight watcher recipe for a Chocolate Peanut Butter Pie. It is SO rich it feels guilty! I really am impressed at how delicious this pie is.....To an untrained eye, they would have no idea it was low in fat and calories! And to top it all, it only consists of 5 ingredients and is super easy to whip up!

Ingredients:
1 reduced fat Graham Cracker Crust
1 large box Cook and Serve Sugar Free/Fat Free Chocolate Pudding
3 cups fat free or 1% Milk
6 Tbsp Creamy or chunky reduced fat peanut butter (I use creamy)
1 small container fat free Whipped Topping
Chocolate Chips (optional)


Cook pudding according to box instructions. While the pudding is still hot, add your peanut butter. Stir until mixed well. Add pudding to the pie shell. Put in refrigerator to cool.
Once cool, top with the whipped topping and add garnish as desired. I used chocolate chips to help give a bit of a crunch while eating. Plus it looks pretty!
Read More »

Tuesday, January 10, 2012

Low-fat Snowball Cake

0
by
Cindy

How's the diet going??? You can have your cake and eat it too!!  This recipe is one of the best lower calorie cakes I've ever made.  I don't claim that it's homemade or gourmet, but it tastes so good.  It's so easy and no one would ever guess that you left out the fattening ingredients.  This is one of the recipes that gets passed around at Weight Watcher meetings and is on the diet recipe threads.  You can adapt this recipe by using a chocolate mix and diet coke or even spice cake with pumpkin.  You can experiment with different ingredients to create something that is a little healther than just cake.  Enjoy, but watch your potions.

1 pkg white cake mix
1 - 12 oz diet Sprite or 7up
1 cup water
1 cup Splenda
1 small tub cool whip
coconut (optional)

Mix together the cake mix and diet Sprite.  Mix on low to blend and then mix on medium for 2 minutes.  Spray a 9 x 13 inch baking pan with Bakers Joy or grease and flour pan.  Pour mixture in pan and spread out evenly.  Bake for about 25 minutes, watching closely not to overbake.  Let cool. 

 In a small saucepan mix 1 cup water and 1 cup Splenda and bring to a boil.  Pour this evenly over cake.  When cake is totally cool frost with cool whip.  Add coconut or chopped nuts as desired.

Read More »

Saturday, January 7, 2012

Low-Fat Oven Baked Stuffed Bananas

0
This is a recipe that I have always enjoyed making. There are only a few, easy steps to create these unique, kid friendly, low fat bananas.  Not only are these bananas delicious, but there's nothing like the amazing smell that is released when you open up the aluminum foil you bake the bananas in. It always reminds me of Mimi's house (one of my grandmothers) and her banana pudding! However, this is a great low-fat substitute if you are watching your weight!

Happy Baking!
Sarah

Oven Baked Stuffed Bananas
Oven-Baked Stuffed Bananas
Hungry Girl

2 T mini semi-sweet chocolate chips
1 sheet (4 crackers) low-fat honey graham crackers, crushed
 4 small banana, unpeeled, ripe, yet slightly firm
1/4 cup mini marshmallows
fat free redo-whip or cool whip (optional)

1. Preheat oven to 400 degrees F
2. Mix chocolate chips with graham cracker crumbs in a small bowl. Set aside.
Cut a slit long and a small one at top and bottom.
3.  Cut a 3/4 inch deep slit lengthwise in each banana from top to bottom. Then cut two small slits width wise at the top and bottom of each banana.  


Stuff the bananas!

4.  Carefully pry bananas open slightly and fill each with 1/4  of the chocolate crumb mixture.  Evenly distribute the marshmallows among the bananas, pressing them into the openings.
5.  Thoroughly wrap each banana in foil that has been lightly sprayed with non stick cooking spray. Make sure it is closed tightly so that the filling doesn't escape.  Place bananas on baking sheet.


7.  Serve immediately either in the peel or scooped out into a bowl. Top with fat free cool whip (optional).


Read More »

Sarah's Back!

0
Long time, no see! So it's been quite a while since my last post. I'm sure you all have been just as busy as I have throughout the holidays. Time sure flies when we are having fun, which is exactly what my family has been doing!!

Since my last post back in early November, many things have happened such as Thanksgiving, my son's 1st birthday, Christmas, New Year's, and a lot of traveling to and from. Needless to say I'm very relieved it's finally January! Here are a few pics of some things I'm made over the past few weeks.
I  made Carter's first cake! 

This was Carter's smash cake!
He enjoyed making a mess!

The insides of the cake were rainbow. 
My husband, Nick, Carter, and me celebrating Carter's big day!
And of course I made some Christmas sugar cookies!


Be on the lookout for these recipes in a few weeks after we get through our low fat desserts. These may ruin your diet if you are like me and can't say no to a sugar cookie!!
-Sarah
Read More »

Friday, January 6, 2012

Low Fat, Low Calorie & Practically Sugar Free - Apple Muffins

0

By: Christy

Why is gaining weight so easy but losing it is soooo much harder? I know the answer, (for me at least). Because I love food! Good food. Luckily, there are still some great recipes that are guilt free. One of my favorite resources for healthy recipes is Spark Recipes. The recipe I am providing today I found about 3 years ago on this site and have consistently made it over and over. These apple muffins make dieting that much easier because one delicious muffin only has about 80 calories, less than one gram of fat, and is totally satisfying for a sweet tooth. This recipe requires getting a little unconventional with some of its ingredients- whole wheat flour, apple sauce, splenda, etc but it all pays off with a guilt free delicious apple-ly treat!

A couple notes to make is that while I think these are absolutely delicious I can kinda tell they are made with splenda. If you are hypersensitive to the taste of artificial sweetener reduce the amount in the recipe or add more cinnamon to the recipe to help mask the sweetener.Also, since there are chucks of fresh fruit within the muffins remember they will go bad quicker than an average muffin. I would try to eat them within 3 days of preparing (that is, if you can keep them around that long in the first place LOL)
    Ingredients:
    3/4 cup all-purpose flour
    3/4 cup whole wheat flour
    3/4 cup Splenda or other sweetener
    1/2 teaspoon salt
    2 teaspoons baking powder
    2 teaspoons ground cinnamon
    1/3 cup unsweetened applesauce
    1 egg
    2/3 cup fat free or 1% milk
    3 small apples (peeled, cored, and chopped)
    Directions:
     
    * Preheat oven to 400 degrees F
    * lightly spray muffin pan with cooking spray (I used cupcake liners)
    * Mix all-purpose flour, whole wheat flour, splenda, salt, baking powder, and cinnamon in a large bowl
    * In a separate, small bowl, mix together the applesauce, egg, and milk.
    * Pour applesauce mixture into flour mixture and stir until just blended (don't over-stir); fold in apples
    * Spoon mixture into muffin pan
    * Bake 25 minutes

    Makes 12 muffins....1 muffin = 1 serving

    Number of Servings: 12
Read More »